editing

Using Flash to Control Reflections When Shooting Through Glass

A few months back, I posted a video and write up describing a handful of techniques that I employ in order to effectively shoot a space that is behind glass without distracting reflections that distract from the design beyond. This video shows a recent example of one of these images from a project we shot with Perkins + Will of an office space in Dallas. This particular space featured a soft seating area in front of a large graphic wall. To add to the difficulty of capturing the space and how it sits within the larger context, the enclosing glazing features a film with a grid pattern which proved challenging when attempting to figure out how best to show the detail of the it, the wall graphic and some models using the room.

By dividing the room into two halves when determining how to light it, we are able to recreate the practical lighting that exists within it, giving a pleasing and natural quality of light. This lighting technique in conjunction with fast shutter speeds allows us to remove the majority of reflections from the camera side of the glass, however we did encounter some harsh reflections in the left hand chair from our strobes bouncing off of the white frames in the left of the frame, leading us to have to flag off those frames using black cloth.

Once lighting was complete, all that was left to do in post was to composite the information together and do some color corrections to end up with the below result.

P+W_Tenet Health_015_v1.jpg

Controlling Reflections in Glass

Ahh, reflections. On set, I will often joke that reflections are the architectural photographer’s arch nemesis. Specifically with commercial and workplace interiors, our objective is generally to show spaces and how they relate as clearly as possible in order to convey the design teams intent without unwanted distractions. One thing that makes this a challenge more than anything else is reflections in glass and other surfaces. Over the years, through a lot of on the job learning, skill sharing with others and trial and error, I have come up with a few techniques that I commonly will employ in order to remove unwanted reflections in order to best tell the story we are trying to convey through a particular image. These can be boiled down to essentially either controlling the offending ambient light on the camera side of the glass or overpowering it within the space that you are trying to show through it. Controlling the ambient light most often means some combination of lighting controls within the space (i.e. turning off all lights on the camera side of the glass that might reflect) or flagging it off using window shades, black fabric/plastic, and other methods. When these options aren’t enough, flash has proven to be an invaluable tool within the space we are trying to convey by overpowering any ambient light therefore removing what is being reflected in the glass from the camera side. Very often we are using several techniques for an individual shot in order to get the best results.

In the video below, I walk through four different scenarios where we were shooting single point perspectives through glazing systems that presented challenges with reflections that we had to troubleshoot in order to get the best shots possible. One thing that helped me greatly over the years is developing an understanding of how reflections work. In the study of photography, we are often taught about the angle of incidence, which is a way of describing how light sources and other objects will be reflected in a subject matter back into the camera. In the case of this topic, it is one of the things that helps me think of what is needed to control objects being reflected into a surface that we are trying to show as transparent. The diagrams below are my attempt at illustrating the angle of incidence when shooting similar shots to the examples below from my video. I have found that our instinct is often to think that all we need to do to control a reflection is build a flag the same size as the surface of the glass area, when really it is far larger. In my career, I’ve done a lot of work photographing for the art community and shooting framed work behind glass was one thing that really helped me get a grasp on this due to the more controllable scale of artwork versus that of architecture and interior spaces. The angle of incidence can be thought of as the reflected angle of that of the projected line from the point of the camera lens to the outer most portions of the reflective surface (glass). This is a complicated concept to describe in writing, so hopefully the diagrams will illustrate this clearly. The import part is to understand that not only are we having to consider what’s directly behind the area of the glass, but also above, below, left and right of that area relative to the camera position and angle. For example, the diagram below shows that the two lights nearest the wall will not be seen in the camera view, but the subsequent to will show up, as will a similar portion of the floor below.

Diagram of the angle of incidence when shooting a single point perspective of a wall with a window in it.

Diagram of the angle of incidence when shooting a single point perspective of a wall with a window in it.

A similar diagram, this time with a flag behind the camera.

A similar diagram, this time with a flag behind the camera.

Hopefully the above information and below video give some insights on how you can go about troubleshooting similar challenges in your own work and help result in cleaner images for yourself and your clients.

Introducing Our New YouTube Channel!

For some time now, I’ve been sharing some timelapses of my post-production process on Instagram as a way to share a peak behind the scenes at what my process looks like after a shoot has been completed and moves into the computer. As camera technology has evolved, so too have the techniques that many of use to create the final product that the world sees. Throughout the development of my career, I have benefited greatly from other photographers willingness to share their techniques and processes, whether it be through online tutorials, informal conversations or working together in person via workshops or assisting. I am creating this channel as an outlet to give a little more insight into my own process in effort to help other photographers who may find it useful and also to allow those outside of our industry to see some of what is often a largely hidden aspect of our job, despite being crucial to creating our end product. Outlets such as online forums, in person meetups and social media platforms like Instagram have allowed architectural and interior photographers to be connected like never before and I continue to be amazed at the camaraderie we have developed across the globe that offers tons of encouragement and ways to evolve within our business. Hopefully this channel can help to add to that sense of community and openness in some small way.

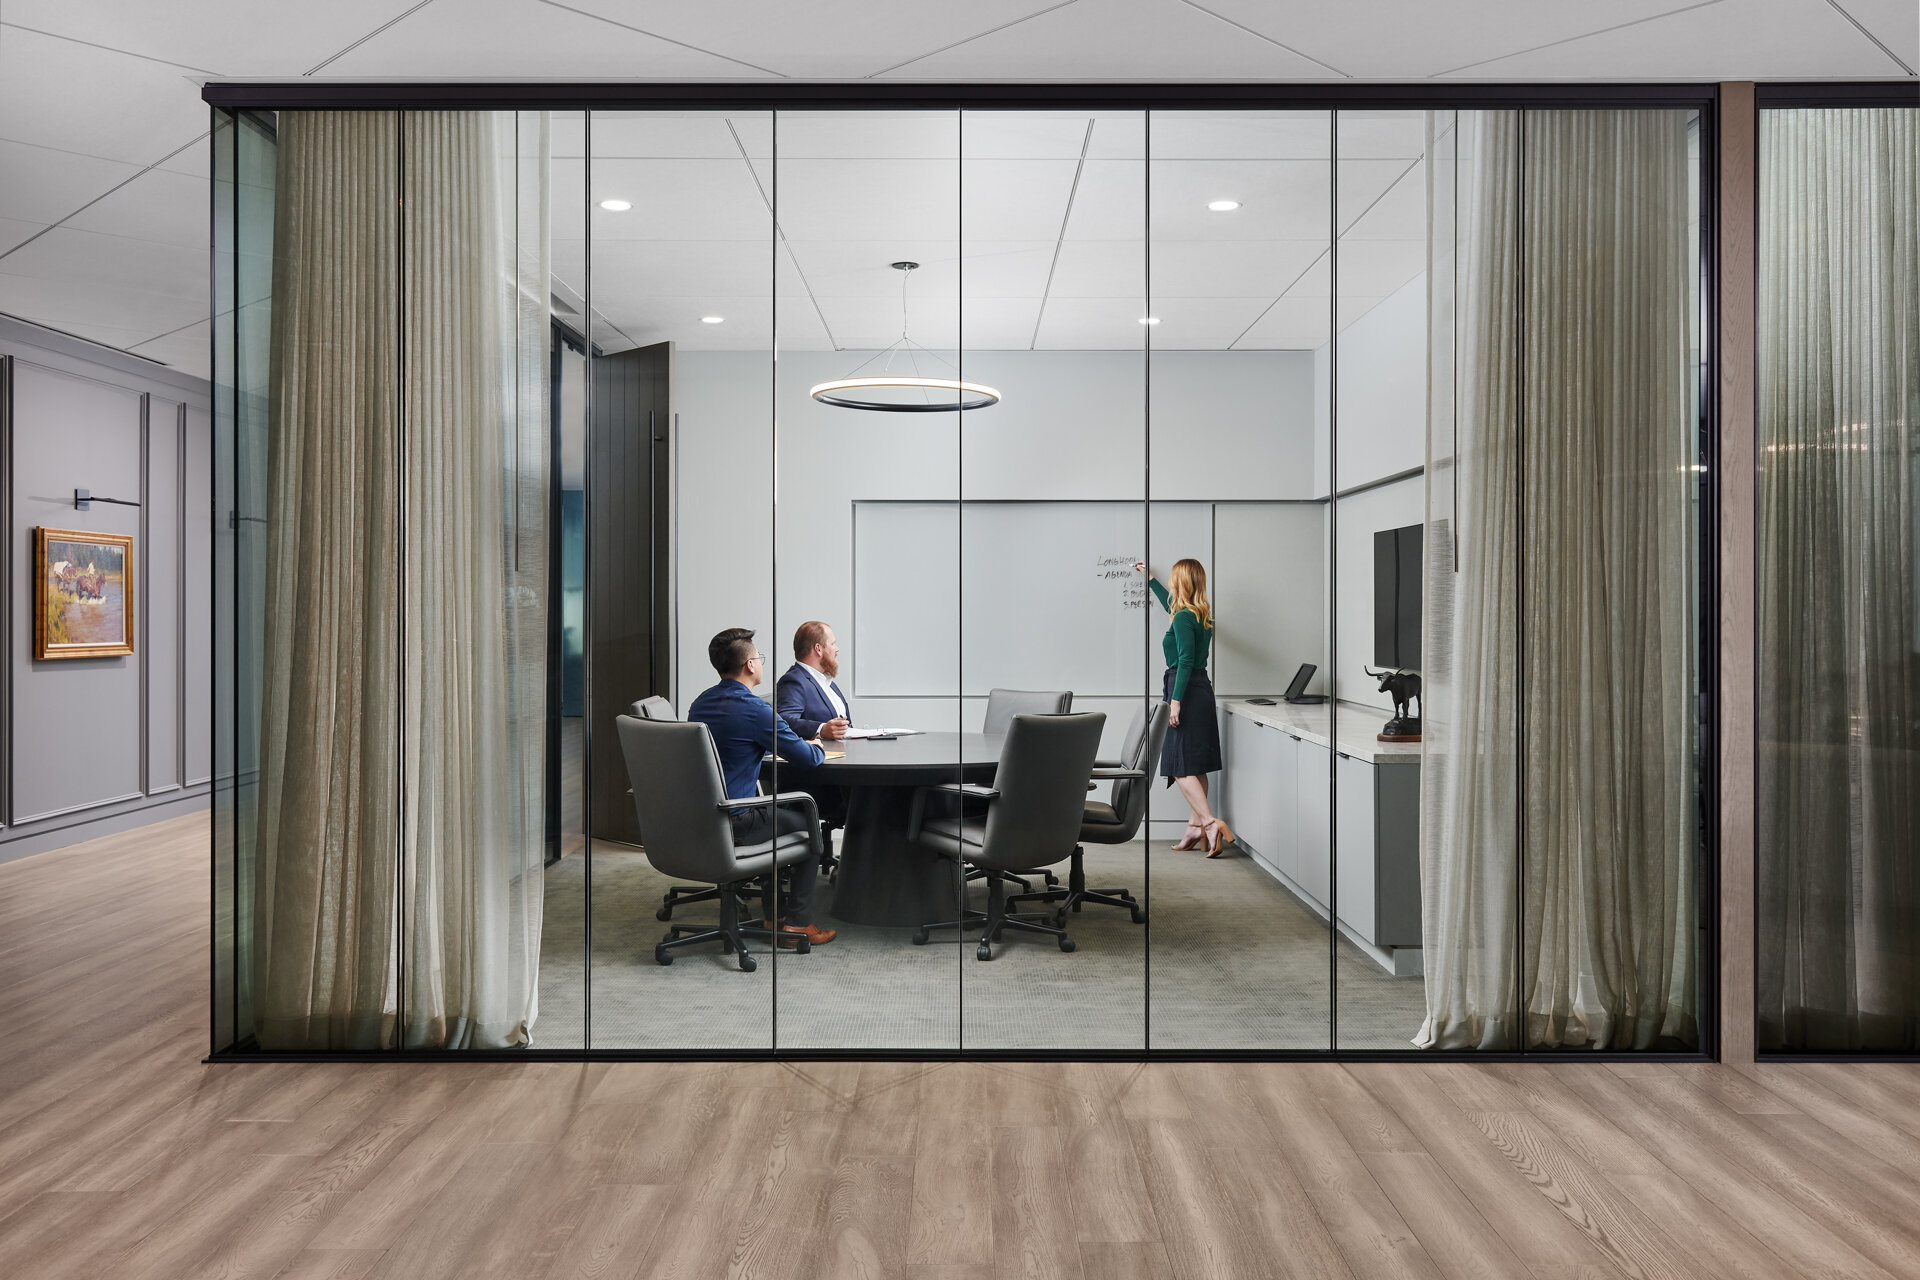
For this first video, the image is of an entry vestibule of the new Whole Foods offices in Austin, Texas designed by IA Interior Architects. The space was very tight, resulting in a rare interior shot using a very wide angle in order to capture the important elements of the design that myself and the design team wanted to showcase. The scene has several challenging aspects to it that anyone who photographs commercial interiors will be very familiar with including challenging reflections, several interconnected spaces, varying light sources and of course, those pesky exit signs. As far as staging and preparation goes, the shot was fairly simple, requiring only minimal staging of the furnishings in the main break area beyond the glass doors and a chair in the phone room. Since most of the items in the lobby are relatively fixed, we just had to tweak a few things so they looked right in camera and then were off to the races to capture the space.

Since this is the first video in the series, I thought I would give a little insight on the process we use when we’re on set in order to answer some questions that I’m sure will come up. Generally speaking, when approaching a commercial interior space, the first thing we do after identifying the angle that best describes a space we are capturing is to stage any existing or temporary furniture and objects so they look best in camera. This can often be meticulous work and requires an understanding of how objects relate to one another and how people might interact with them in an image while not causing distractions or clutter. Once this is complete, we will run through a series of frames using ambient light, sometimes employing techniques to control the available light so that we can get the best result. After that is when we’ll usually bring in artificial lighting if needed to clean up unwanted color casts, better shape objects and sometimes create daylight when it’s not there. The next and last step is to bring in models when they are being used, which is a great way to give a space some life while also showing the scale and intended use. With this and subsequent videos, I hope to shed some light on how I then bring all of these pieces together to create a final image. For a little more insight on my process, visit my interview with Veeral Patel with AP Almanac.